How to Make Fake Water for a Project
The school doesn’t only require you to study your books and pass your exams. There are many other things you need to do. Sometimes, you will be required to do various kinds of projects for your classwork or some competition. Around that time, you will have to find different types of ways to complete the project. One thing a lot of school students suffer from is creating realistic items. Sometimes, you will even need to make fake water. So, if you need any help with how to make fake water for a project, we are here to help you with everything.

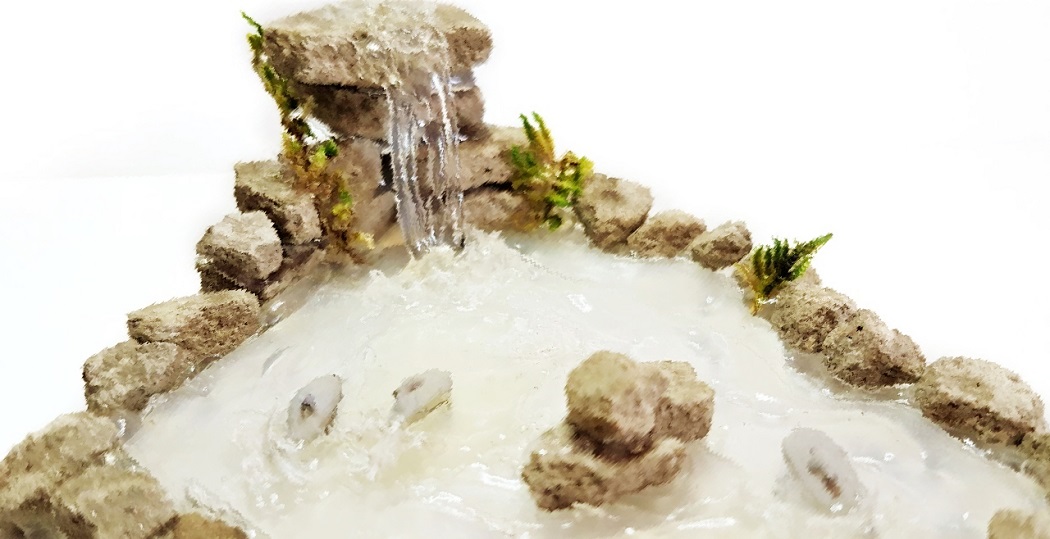
Fake water is mostly used in a project like a diorama. There are many reasons why real water is not preferable for use in those projects. The most highlighted ones are that it will make everything messy, and you will not get the desired shade of water you are looking for. For those reasons, many people tend to lean on using fake water. There are various ways you can resemble some elements like water, and we will tell you two ways how to make fake water for a project.
Summary: To create fake water for a project, you will need some common household supplies and a little creativity. First, fill a plastic container with water and add a few drops of food coloring to make it look realistic. Next, take a bowl or cup and fill it with water. Use a chopstick or other sharp object to make small holes in the top of the bowl or cup. Pour the colored water into the container and let it sit for a few minutes so the colors mix together. Finally, use a spoon to fill the holes in the bowl or cup with the fake water and put it back in the fridge for use in your project.
DIY: How to Make Fake Water for a Project
First Way
We will show you how to make fake water for a project by using glue. If the water stream is comparatively small, then the glue option is a great way to go. The glue is also a great way for those projects that require a lot of blue shade for water.
The Things You Will Need:
Elmer’s School Glue Gel:
You will need to use gel glue. This type will give you a more transparent look.
Blue Food Coloring:
Get some food coloring which is blue in color.
A Plastic Container or Plate:
Make sure that the plastic container you are taking has high ridges. That way, it will hold your fake water well.
10 Step-by-step Guidelines on How to Make Fake Water for a Project:
Step 1: Prepare Your Working Area
Get a clean and flat work surface to avoid any mess while making the fake water. Also, make sure you have access to a sink or water source in case of spills. You can also lay down some newspaper or paper towels to protect your work surface. It is always better to be prepared. The last thing you want is a messy work area.
Step 2: Squirt Some Glue onto Your Container
Take your plastic container or plate and squeeze some glue on it. The amount of glue depends on the size of your project, but you will need enough to cover the bottom of the container in a thin layer. It’s better to start with less and add more later. You don’t want to end up with too much glue. But if you do, don’t worry. You can always wipe it off with some paper towels.

Step 3: Spread the Glue Evenly
Spread the layer of glue evenly across the bottom of your container using a flat object like a ruler or popsicle stick. Make sure you have an even layer throughout the container, and there are no gaps or holes. Otherwise, you may end up with uneven fake water. It is also essential to have a thin layer of glue, so keep spreading the glue until you are satisfied with it. You don’t want a thick layer of glue in your project.
Step 4: Add Drops of Blue Food Coloring
Now comes the fun part. Take your blue food coloring and add a few drops evenly across the container. The amount of food coloring will vary depending on the size of your project and the shade of water you want to achieve. Start with a few drops and add more as needed. You can always test the color by adding a drop of fake water on a white paper towel. The color will be a shade lighter when it dries, so keep that in mind.
Step 5: Mix the Glue and Food Coloring
Using your flat object or popsicle stick, mix the glue and food coloring together until you get an even shade of blue. Make sure to mix it well, or you may end up with streaks of white glue in your fake water. Keep mixing until the color is even throughout. But be careful not to mix too much, or the glue may start to dry up.
Step 6: Add More Food Coloring
If you want a darker shade of blue, add more food coloring and mix again. You can repeat this step until you achieve your desired shade of fake water. Keep in mind that the color will appear lighter when it dries, so add more drops than you think you need. It’s easier to darken the shade than to lighten it. But don’t worry; even if you end up with a lighter shade than you wanted, it will still look like realistic water in your project. You can also experiment with different shades of blue by mixing in a drop or two of green food coloring. It all depends on the type of water you want to recreate.

Step 7: Let the Glue Rest
After mixing, let the glue sit for a minute or two. This will allow any air bubbles to escape and give you a smooth surface. You can also use your flat object to spread out any remaining air pockets. It’s essential to have a bubble-free surface for a realistic look. You can even use a straw to blow on the surface and eliminate any bubbles. The glue will start to dry, so make sure you don’t take too long. It’s better to work quickly.
Step 8: Add Your Project’s Base
Now that you have your fake water ready, it’s time to add your project’s base. You can use a plastic base, glass, or any other material that is waterproof and suitable for your project. Make sure the base is clean before placing it on top of the fake water. You can also use a clear plastic sheet and place it on top of the fake water to create a more transparent surface. This will give your project an even more realistic look. It’s all up to you and your creativity.
Step 9: Let It Dry
Now that you have your project’s base set up let it dry for a few hours. The glue will take some time to dry entirely, so be patient. You can also use a hairdryer on low heat to speed up the drying process, but make sure you don’t apply too much heat, or it may cause the glue to warp or melt. Once the glue is dry, you can touch up any areas that need more color or add some more food coloring to create a layered water effect.
Step 10: Enjoy Your Realistic Fake Water
Congratulations! You have successfully made fake water for your project. Now, you can use it in various projects like miniature scenes, model dioramas, or even crafts. The possibilities are endless. The best part is you can make as much fake water as you need without worrying about it drying up or turning yellow like real water. So go ahead and enjoy your realistic fake water. But remember to clean your plastic container or plate before the glue dries, or it may become difficult to remove later on.
Following these guidelines, you can easily make fake water for any project. You can also experiment with different shades and textures by using different types of glue or adding in other materials like glitter or small beads to create a realistic water effect. Have fun creating your masterpiece! So, next time you need fake water for a project, don’t worry about buying it from the store. Just follow these simple steps and make your own custom fake water that looks just like the real thing. Happy crafting!
Additional Tips:
- If you want to create a ripple effect, you can use a toothpick or small brush to make gentle strokes on the surface of the fake water while it’s still wet.
- You can also add some white food coloring to create foam or waves on your fake water surface. Just mix it in with the blue food coloring before adding it to the glue.
- For a more realistic look, you can add in some green or brown food coloring to create different shades of water for lakes, oceans, or even muddy water.
- If you’re using the fake water for a long-term project, make sure to seal it with a waterproof sealer to prevent any yellowing or discoloration over time.
- Don’t limit yourself to just blue water. You can use this technique to create other liquids like milk, juice, or even lava for volcano projects. The possibilities are endless! So get creative and have fun with it.
- When working with food coloring, make sure to protect your work surface and clothes as it may stain. You can also wear gloves to prevent any unwanted staining on your hands.
- If you have leftover fake water, you can store it in an airtight container for future use. Just make sure to mix it well before using it again.
- Lastly, have fun with your project and don’t worry about making it perfect. The beauty of DIY projects is that they are unique and reflect your personal touch. So enjoy the process and let your creativity flow!
- Don’t be afraid to experiment with different materials and techniques to create unique effects for your projects. You never know what amazing results you might achieve! So keep exploring and have fun with it. That’s the beauty of crafting – there are no limits to your imagination. So go ahead and make some incredible fake water for your next project!
Do You Need to Get Help From a Professional?
No, making fake water is a simple and fun DIY project that anyone can do at home. You don’t need any special skills or equipment to create realistic-looking fake water. Just follow these steps and let your creativity flow. However, if you’re working on a large-scale project or want to achieve a specific effect, you can always seek help from professionals who specialize in creating fake water for film and stage productions.
They have advanced techniques and materials that can help you achieve your desired result. However, for most craft projects, following these guidelines will be more than enough to create stunning fake water. So go ahead and give it a try! You’ll be amazed at the results you can achieve with just a few simple steps.
How Much Could It Cost?
Making fake water is a budget-friendly project, and most of the materials needed are readily available at home or can be easily purchased from any craft store. The cost will depend on the quantity of glue you use and any additional materials you may want to add for texture or color. On average, it could cost between $5-$10 to make fake water for small projects. However, the cost may vary based on your location and the type of materials you use. So feel free to adjust and experiment with different options that suit your budget.
Frequently Asked Questions:
Q: Can I Use Something Other Than Food Coloring to Color the Glue?
A: Yes, you can use acrylic paint or even eyeshadow to color the glue. Just make sure to mix it well and test a small amount first before adding it to the entire batch of glue. You can also mix in different colors to create custom shades for your project. It’s all about experimenting and finding what works best for you.
Q: How Long Will the Fake Water Last?
A: The fake water will last as long as you take care of it and store it properly. If kept in an airtight container, it can last for months or even years. However, if exposed to air or sunlight, it may start to dry up and become brittle over time. So make sure to seal and store it properly for long-term use. The color may also fade over time, but you can always touch it up with more food coloring if needed.
Q: Can I Use This Technique on Different Surfaces?
A: Yes, you can use this technique on various surfaces like paper, cardboard, plastic, or even glass. Just make sure the surface is smooth and clean before pouring in the fake water. You can also try using different textures for a more realistic effect, such as adding sand or small pebbles to create a beach scene. The possibilities are endless, so don’t be afraid to get creative and experiment with different materials and surfaces.
Q: Is Fake Water Safe for Kids to Use?
A: Yes, fake water is safe for kids to use as it is non-toxic and does not contain any harmful chemicals. However, it is always recommended that children be supervised while they are working with any materials, including food coloring, and remind them not to ingest the fake water. Also, make sure to wash your hands thoroughly after handling the fake water. Safety should always be a top priority when crafting with kids.
Q: Can I Use Fake Water Outdoors?
A: It is not recommended to use fake water outdoors as it may not hold up well against weather conditions like rain or wind. Also, exposure to sunlight may cause discoloration and drying of the fake water. However, you can use it for temporary outdoor projects that won’t be exposed to the elements for an extended period. It’s always best to keep fake water indoors to preserve its quality and longevity.
Final Thoughts
That was all from how to make fake water for a project tutorial. Our ideas and content will hopefully help you create the water you wish for and make the best project for everyone else. If you followed all the steps correctly, you should now have a realistic-looking fake water to use in your project. You can even make small changes and adjustments based on your personal preferences and ideas. The key is to experiment and have fun with it! We hope this tutorial was helpful, and we wish you all the best for your future projects. Happy crafting!
You may read also –
Elizabeth Davis
Elizabeth is a creative writer and digital editor based in the United States. She has a passion for the arts and crafts, which she developed from a young age. Elizabeth has always loved experimenting with new mediums and sharing her work with others. When she started blogging, she knew that DIYquickly would be the perfect platform to share her tutorials and tips. She's been writing for the blog from the beginning, and her readers love her helpful advice and easy-to-follow instructions. When she's not writing or editing, Elizabeth enjoys spending time with her family and friends.