
How to Make Paper Mache Smoother
Paper mache is a sculpting technique consisting of sheet parts connected by a sticky mixture originating from the French’s chewed paper. Nowadays, two standard systems are typically used to produce a paper machine. The craftsman binds onto long, thin pieces of paper for the very first method, which is typically placed and stacked upon some other kind of framework.
The sculptor produces a pulp by heating or sinking pieces of paper connected by water for the second method. It is then possible to shape the combination like mud. While both planning and process vary in such methods, both have a composition containing page and paste.
Due to the extreme internal stator, sculptures created of conventional paper strips and paste are often uneven. This is particularly true when, as I sometimes do, you make frames with the crumpled sheet and masking glue. I’ll send you some tips in the post down that you’ll need to create your sculptures flawlessly.
Be sure to follow the most recent post on designing a new Mache clay smoother. That’s the same idea- essentially, only avoid all of the items listed on this list or use the drywall pair’s bind. For your next Mache project, any harshness or unevenness could be precisely what you want.
The ‘look’ logo of paper stripes and paste can also give a specific fascinating characterization to the piece. But individual sculptures, for drawing, require a more refined base. In the Recipes segment, you can see all of the components I listed in the post.
I came up with the Mache mold formula about nine years ago to get rid of the bumps that come with using paper scraps and paste. But even if you’re not using the Mache clay method, you can still make your model as perfect as you want.
Before the paper sheets start to be added.
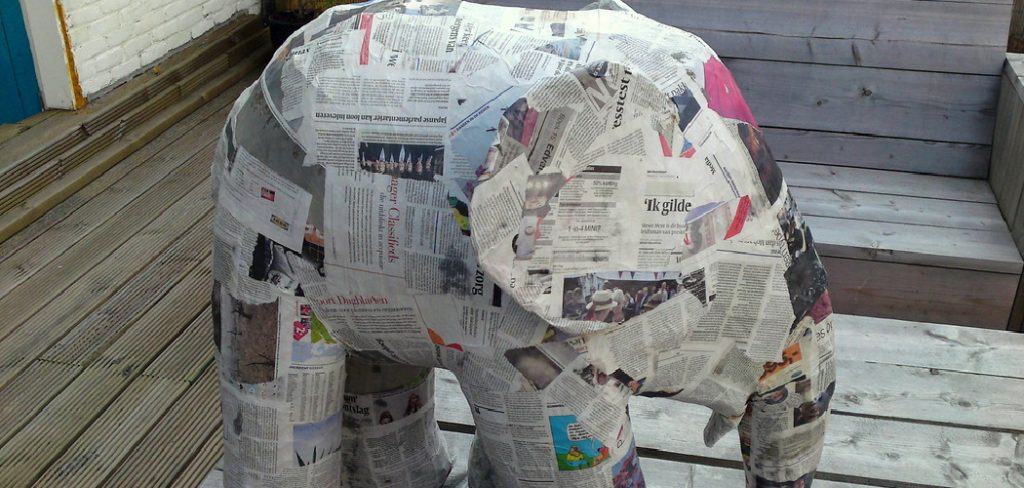
If you want a paper to fall better, you should rip it rather than slice it. This is because any material is too rigid to mold itself into the forms of the armature. The type of material is also significant. Both newspapers and the material used for the contact book operate exceptionally well. When you use sufficient coating, the thick brown papers from shopping bags can also work. The liquid in the mixture could loosen the form. However, many papers for magazines are too rigid.
A simple touch could be what you want.
Sometimes, what you have to do to create typical filing stripes and paste smooth would be to use relatively finer sandpaper to clean the paper strips’ outlines. Using fresh flour and liquid mixture can also support, leaving small bumps of dry coating on the ground. You can cut the paper and put it in place before you set to paint.

Instructions:
Type 1:
• There are many various methods of making a paper Mache mixture, as in any homemade blend. That being said, the most common formula needs only two components: flour and water.
• Easily add 1 component (– for example, 1 cup) of flour with two parts (e.g., 2 cups) of water to create the solution.
• Ensure the strength of your mixture is consistent and close to that of standard adhesive. You’re ready when your mixture has reached this stage, but if you find your mixture is too dry, you can add 1/2 tablespoon of salt per cup of flour. When the artwork is dry, this will help to remove mold.
• You have to collect your papers until your mix is full (daily paper and tissue paper are standard options, but you can use forms of every type) and cut it into pieces. Next, you should mix the sheet bits with the paste, based on the procedure. Mache is exceptionally flexible for such a basic mixture; the options are endless!
• Even so, for both accomplished artisans and those seeking to improve the art, there seem to be certain popular practices that are ideal. Using a standard balloon as a template is one tried and tested way of Mache sculpture.

Type 2:
• It is a fantastic method to accomplish objects with a circular form, like shells, animal limbs, and even pots. To using this technique:
• To the appropriate length, keep increasing the balloon.
• Dip a sheet of paper into the mixture when thoroughly soaked, enabling the solvent to absorb.
• Put the balloon material and use either the palm or brushes to smooth out certain irregularities orbits.
• Repeat till there are 2 or 3 levels of paper coated with the balloon.
• A day or several, just let the piece dry.
• Break the bubble using a pin.
• Decorate the statue or customize it.
Type 3:
Robust papers or cardboard can be used to design a homemade template. You could make any form you could picture by slicing up the material and connecting the parts with sticky tape, with wildlife one of the most common options, particularly leopards, gazelles, and many others used during piñatas, that are usually homemade cups made from Paper Mache, packed with sweets, and shattered as a type of celebrations.
• Build the framework of parchment.
• Saturate the coating with a sheet of parchment.
• Position the sheet on the paper; please ensure any lines are smoothed away.
• Repeat until there are 2 or 3 levels of paper covering the board.
• A day or several, allow the piece dry.
Type 4:
The fourth standard paper-making process is to produce a pulp. This method does not involve paper sheets soaked in water, unlike the balloon and cardboard techniques. Instead, you have to blend the sheet (no flour required) with water. This shapes a material like a putty to operate without a template or framework to create a free-standing model.
• Ripping the paper into tiny bits (approx. 1/2 inch is optimal).
• Put the bits in a bowl to combine.
• Apply 2 cups of hot water to the paper, swirling to assure all the parts’ coverage.
• Let calm the combination.
• Ease the paste into a pulp using a mixer.
• And use a colander, rinse the pulp, ensuring any extra water is extracted.
• Build your artwork.
This means of obtaining Mache sculpture remarkably smoother is simple; besides what else is in the post, it doesn’t require a lot more detail. You might like to learn instead of the view; this is how it’s performed.
Once you have your initial idea down, it’s the easiest way to create a sculpture with a unique and amazing look. When crafting any sculpture, it’s important to take the plans of the building pattern pieces into account. No matter what type of sculpture you’re working on, this approach to starting should help you create a masterpiece.
Frequently Asked Question
Why Is My Paper Mache Not Smooth?
There are a few reasons why your paper mache may not be smooth. One reason is that the paper you are using may not be of the right quality. Make sure to use high-quality paper that will not cause your project to fail.

Another reason is that you may not have applied enough pressure when you were mixing the ingredients. Make sure to apply enough pressure so that the mixture becomes a thick paste.
If these tips do not work, then it might be necessary to try another type of paper mache or find a different supplier.
Is Glue or Flour Better for Paper Mache?
There is no definite answer as both glue and flour can be used for paper mache. However, if you are looking for a more durable finish, then using glue would be the better option.
What Makes Paper Mache Harder?
There are a few things that make paper mache harder, but the most important one is the use of fiberglass. Fiberglass is a type of plastic that is used to make molds for products like cars and boats.
When paper mache is made using fiberglass, the finished product becomes much more difficult to remove from the mold. This is because fiberglass forms a tight bond with the paper, making it very difficult to break apart.

Final Thoughts
Now, when I get to the measures, I must note that most individuals are using a thin coating of mache mud in their initial coat, and afterward, they blend up a sample of Silky-Smooth Air Dried mud to use it as the base level. Yet I’m impatient and still in a rush to complete a job. This softening process with a blend of rubber spatula and drywall combination is much smoother and quicker.
You May Read Also.
Elizabeth Davis
Elizabeth is a creative writer and digital editor based in the United States. She has a passion for the arts and crafts, which she developed from a young age. Elizabeth has always loved experimenting with new mediums and sharing her work with others. When she started blogging, she knew that DIYquickly would be the perfect platform to share her tutorials and tips. She's been writing for the blog from the beginning, and her readers love her helpful advice and easy-to-follow instructions. When she's not writing or editing, Elizabeth enjoys spending time with her family and friends.


