
How to Refinish a Cedar Chest With Veneer
Cedarwoods are well-known for their unmatched durability. This wood is decay resistant and can withstand every weather condition. That’s why many people love this wood more than anything others. Another good reason for its popularity is its delicate scent and moth-repellent properties. All these have made it a perfect one for making different types of storage furniture, and many people love to do that. That’s why a cedar chest is like the crown jewel of a home prized by homeowners. As they move from family to family for decades because of their durability, it can become worn, get several scratches or fading. Don’t worry; it won’t break down, only its look can get hampered. With some simple steps, you can bring back its look and make it as good as new. So, how to refinish a cedar chest with veneer?
You might be wondering why veneer. Actually, veneer offers the maximum amount of versatility, and when you apply it on your cedar chest, it will offer a new look on that. As a result, you will be able to acquire a new look and keep this preserved for another few decades. Interesting right? Well, that’s the reason most of the owners prefer varnishing their cedar chest and googles “how to refinish a cedar chest with veneer?”
Say, thanks to google, that it has brought you to the correct place because you will get the easiest way to ensure your desired look on your cedar box. So, without any delay, let’s dive in!

Summary: Looking to refinish a cedar chest with veneer but don’t know how to start? This blog post will walk you through the process step-by-step. First, sand down the entire chest to remove any previous finish. Then, use a wood sealer to protect the new finish from moisture and dirt. Finally, apply your veneer in a layer over the sealer, using a variety of techniques to get the perfect look.
You’re Going to Need These Tools
- Varnish
- Plastic sheeting
- Paint Scraper
- Painter’s mask
- Safety glasses
- Painter’s tape
- Rubber gloves
- Chemical stripper
- Paintbrush
- Rags
- Soft cloths
- Fine-grit sandpaper
- Stain

How to Refinish a Cedar Chest With Veneer
If you want to achieve something, it is important to follow the correct steps and put in some effort. However, if you do not follow the right process, it can be very difficult and take a lot of time. Luckily, by following these simple steps, you can achieve your goal with less time and effort.
Step 1 – Preparation
First of all, you have to prepare your cedar box for work. Your cedar box will definitely contain lots of precious things inside, and you won’t be able to continue your working process with those. So, remove all of those items from the chest. On the other hand, you are unable to remove those items; simply use the plastic sheet to cover all of the items and keep them secured. Now, you have to take some time to check out the condition of your box. The good one will be always in the good shape, but it may not happen if the box is too old.
Step 2 – Safety Check
You have to ensure your safety first because veneering can be dangerous if you don’t use proper safety elements. In this case, put on your safety glasses, rubber gloves, and painter’s mask before moving forward. These things will keep you protected and prevent the varnish from having direct contact with your skin. After that, you need to gather all the necessary tools. For this project, you will need wood veneer, scissors, contact cement, a roller, a putty knife, and a straight edge.
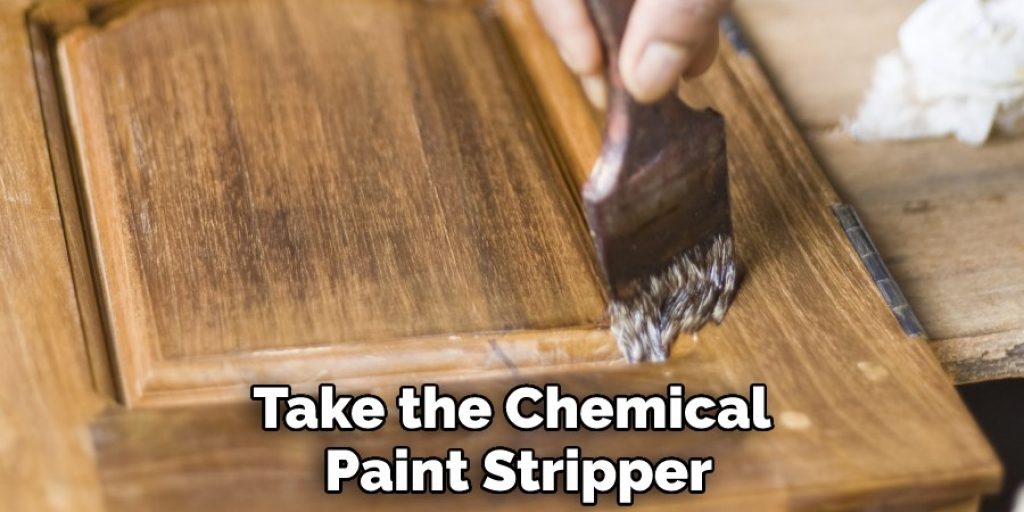
Step 3 – Strip the Old Finish
Now take the chemical paint stripper you have bought and apply it to the exterior part of the chest. In this case, you can use the paintbrush to apply it properly to small sections. Let the stripper sit on the wood surface. Then use the paint scraper to scrape the softened paint away.
Step 4 – Sand Scraping
Be sure to scrape off all the old paint carefully, without leaving any residue. Be careful not to damage the surface of the chest while you’re doing this. Once you’ve scraped off the old paint, use the sand scraper to make the surface smoother. Remove any traces that may remain while scraping the paint.
Step 5 – Applying the Finish
We have come to the final step, and in this step, you have to apply the veneer. You have to select the type of veneers from its three different types. However, place the chest on the paper and then start wiping the veneer with a damp cloth over the entire surface of the chest. Make sure to keep the surface free of dust while you are applying veneer on it. Once you complete it, apply a coat of primer and, after several hours, apply the second coat of it. Then let it dry.
Frequently Asked Questions
What Is a Cedar Chest Used for?
A cedar chest is a type of furniture that was traditionally used to store clothing and linens. Nowadays, they are commonly used as a decorative piece of furniture or a storage unit for things like toys, blankets, towels, books, DVDs, and other home decor items.
The most common types of chests are those made from hardwood or cedarwood. Cedar chests were traditionally made by African American carpenters in the United States during the 18th century.
Why Are Chests Lined With Cedar?
Cedar is a tree that grows in North America and Asia. It’s very aromatic, meaning it has a strong smell. It also has many uses like lumber, paper, ornaments, and musical instruments.
Chests are lined with cedar because of their natural oils, which repel insects and help to protect against wood rot and mold. Cedar oil also keeps the wood from swelling too much when wet.
Can a Cedar Chest Be Refinished?
Cedar chests are typically made of beautiful wood that is durable and long-lasting. They can also be easily refinished, making them attractive for furniture or decorating projects.

There are many different methods for refinishing cedar chests:
• Hot water with steam: This method involves submerging the chest in hot water and then using a towel to create steam inside the chest. The process is repeated until all of the moisture has been removed from the wood.
• Acidic solution: An acidic solution is used to strip away old finishes, exposing fresh wood underneath. You will need to purchase various ingredients like vinegar, muriatic acid, hydrogen peroxide, and lacquer thinner at your local hardware store to use this method.
• Sanding: This technique involves sanding off old finishes by hand or with a power sander and finishing off with a coat of paint or varnish over the top to protect it from further damage or wear.
Can You Refinish Veneer Tops?
Yes, you can refinish veneer tops. It is possible to do it at home and with the help of a few simple tools like sandpaper and wood stain. However, you will need to be careful because if done incorrectly, your top could end up looking worse than before, or there might be potential health risks from doing it yourself.
Can You Varnish Wood Veneer?
You can varnish wood veneer using a number of different techniques. The first step is to apply a coat of sealant and then apply several coats of finish. The next step is to use a spray gun and paint on the sealant. A brush or roller will also work well for this type of application.
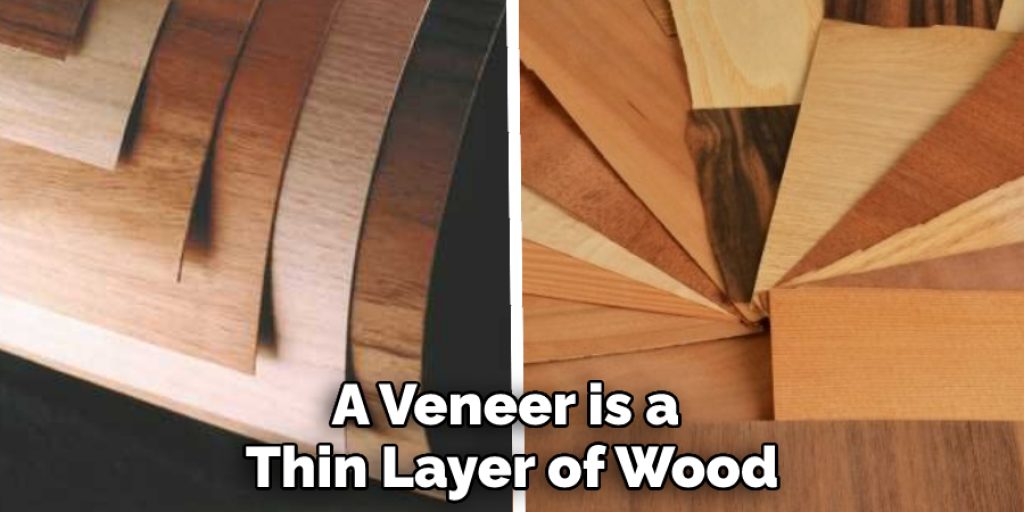
What Is Veneer Used for?
A veneer is a thin layer of wood, plastic, or other material that is applied to the surface of another material. Veneers are often used in furniture and boat building as well as other industries.
In furniture making, veneers are sometimes applied to plywood to create a patterned design that can be seen on the front side of the piece. The term “veneer” comes from the French word for “wool,” which means that it was originally made from wool cloth.
The most common use for veneer is in boats where one sheet of plywood is covered with several layers of veneer tape and resin-based lacquer paint or varnish before being covered with fiberglass cloth for added strength and beauty.
Conclusion
Hopefully, you will get your desired results through the above steps. These are the simplest steps for applying a veneer coat to the cedar. If you have got any questions, feel free to ask us through the comment section.


