
How to Tile Shower Ceiling
Tile shower ceilings are becoming more and more popular. If you’re tired of the plain white color, or if your tiles are looking old and cracked, this article will show you how to tile shower ceiling. It’s not complicated at all!
The first thing is to make sure your surface is clean and dry before you start tiling.
Clean it with a mild detergent so there isn’t any residue left behind from the soap scum on the tiles or mold growth between them. Next, ensure that all surfaces have been cleaned thoroughly, so there aren’t any spots for dirt to collect when you apply grout later on.
Next, use spacers to divide each space where a tile should go. Read on for more information about how to tile shower ceiling from start to finish!

10 Reasons Why Tile Shower Ceiling:
Tile shower ceilings have many benefits; below is a list of the top ten reasons why you should choose to tile your shower ceiling. In addition, it will give you insights before knowing how to tile a shower ceiling. So read on!
1. Affordability:
Tile Shower Ceiling has a variety of prices and materials to make it affordable for almost anyone. There are even ways to alter tiles, while drywall is very expensive.
2. Easy To Keep Clean:
The ceiling is easy to clean because you don’t have to worry about water damage.
3. Safety:
Falling tiles can be dangerous if they are loose or old; tiling the shower ceiling prevents this from happening.
4. Texture:
Tile Shower Ceilings offer a rare texture on the walls of your bathroom that cannot be achieved with regular drywall or fiberglass panels.
5. Variety:
Tiles are available in many different styles, shapes, colors, and textures to fit any design you want in your bathroom.
6. Texture:
Tile Shower Ceilings offer a rare texture on the walls of your bathroom that cannot be achieved with regular drywall or fiberglass panels.
7. Long Lasting:
In most cases, tile is more durable than drywall and can last far longer.
8. Easy To Install:
Tile Shower Ceilings are very easy to install; there is no complicated process, whether you decide to do it yourself or hire someone to do it for you.
9. Customizable:
The tile shower ceiling can be customized to fit your needs and your aesthetic.
10. Environmentally Friendly:
Tile is recyclable and, over time, reduces the amount of waste from old or damaged tiles going into landfills because they are reusable.
In conclusion, tile shower ceilings have many benefits that make them a better choice than other options for your ceiling. Below we have given the steps on how to tile the shower ceiling, so be sure to check that out.
Tile Shower Ceiling Materials:

There are many different materials for tiling your shower wall or ceiling; here are some tile options that you can choose from.
1. Ceramic Tile: This is the most common material used in tiling because it retains water well and is easy to clean. It is an excellent option if you have a lot of time and patience because it takes a while to set.
2. Glass Tile: If you want your shower to have that elegant look, then glass tile is the best choice for you, but be prepared for it is expensive and fragile.
3. Porcelain Tile: This type of tile is very similar to ceramic tiles and shares many of its characteristics, such as retaining water, but porcelain tends to be more durable.
Tile Shower Ceiling Tools:
1. Ceramic Tile Cutter: This tool will make cutting your tiles much more accessible and cleaner because the blade is solid and accurate.
2. Tile Saw: If you have a lot of tiles to cut, this is the tool that you should consider using because it will help you save a lot of time and effort.
3. Grout Float: When applying grout to your tile, you need to use a float to fill all the gaps between them. There are two different types, a plastic one and a rubber one.
Step by Step Guide: How to Tile Shower Ceiling
Step 1: Preparation
The first step is to remove everything from the shower room, including the curtains, door, sink, or whatever else was in there, so you have more space to work with. Then check if the walls are level by using a spirit level. If the walls are not level, fix them using a mix of cement and sand.
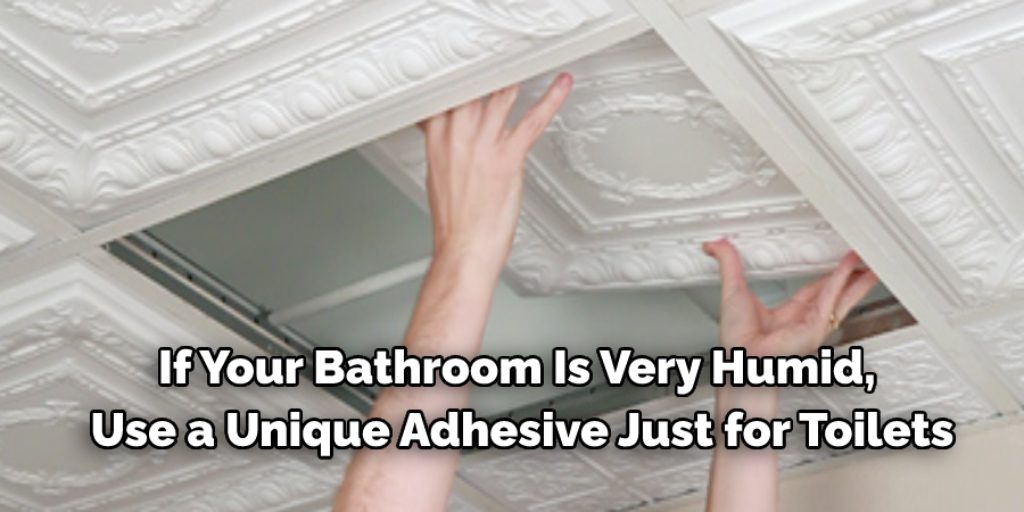
Step 2: Applying Tile Adhesive to the ceiling
If your bathroom is very humid, use a unique adhesive just for toilets. First, shake the can well for several minutes before you apply it. Then, apply it with a plastic trowel in an even layer over the ceiling. Keep the nozzle of the adhesive can about 25 cm from the top, and do not move for a full minute to allow each layer to dry, or you will get bubbles.
Step 3: Applying a Cement Primer
To keep your walls in good condition, apply a cement primer with a brush so the tiles have something to stick to. The primer is the most crucial step. Leave it to dry for at least 24 hours and ensure there’s no dust on it before you start tiling, or the tiles will not stick properly.
Step 4: Applying a Patterned Cement Film
The next step is optional, but you can apply a patterned cement film to the ceiling if you want to give your bathroom a trendy look. Tear the patterned film into pieces and apply it to the top with wallpaper glue. You can overlap them slightly, so they stick together, but let each layer dry for at least 24 hours before applying the next one.
Step 5: Masking & Taping
You can use painter’s tape for this step, but we recommend using masking tape. It is thin enough to cover your grout lines but thick sufficient to prevent any possible slipping and causing more work.
If the ceiling is textured like mine, you’ll want to be more careful as paint and texture do not make a long-lasting bond, and you may experience chipping and flaking.
Lay your tape around the ceiling perimeter and at least halfway between existing tiles, and avoid corner beads if possible. With about 30 minutes remaining, we suggest starting this step.
Step 6: Cutting Grid Tape for Linear Tiles
Use grid tape for linear tiles such as brick pattern, herringbone, diagonal, checkerboard, etc. For this process, you will want to determine the size of the linear tile that you are working with and cut a piece of grid tape at least four inches longer than its total length.
This is, so you have plenty of room for error when tiling. The grid tape for linear tiles needs to be cut, one piece at a time.
Step 7: Putting up Tile Strips
Make sure you have a rubber float and a plastic measuring tape so you have something to flatten the tiles when they are in place. Otherwise, your tiles will run out of line when you start grouting them.
Hold each tile strip and measure from the end of the grout line to ensure that you will have enough room for it. If you don’t have enough space, cut a little off each tile strip until you have ample space.
Focus on one row at a time and work methodically rather than cutting some tiles short and others long so they all fit together in one row. When tiling, make sure to lock the tiles together by tapping the tiles with your rubber tile float.
Do this methodically so you won’t have any gaps in between rows. Finally, the last row should be cut to whatever length is necessary to fit using a miter saw.
Step 8: Grouting
Grout is mixed at a 1:3 ratio of powder to water (1 cup water : 3 cups grout). Mix the grout according to instructions. You will need three mixing containers; one for clean water, another to mix the powder and water, and the third container to hold the dirty water when you are done mixing.
Mix 2 cups of grout and work in batches to ensure that the consistency will remain the same. Mix it slowly so there won’t be any air pockets or many bubbles, as this will create voids between tiles later on when you’re tiling.
Step 9: Curing & Sealing Grout
Ensure that you use a sealer on the grout to protect it from stains, water damage, and wear. Use a grout float to smooth out all ridges in the grout line left by the rubber float after every couple of tiles.
Let your tile area dry for about 24 hours before using it again. You can also maintain the tile by sealing grout once a year.
Step 10: Application of Cement Film
If you used a cement film, apply it on the walls and floor after all tiles have been put up and grout has dried according to the manufacturer’s instructions.
Arrange each sheet of tile in your desired pattern, making sure that the edges align with your tile area. To check for a perfect fit, hold a corner of the sheet up to the tile area. If everything lines up, use a utility knife and straight edge to cut off any excess cement film.
Step 11: Applying Adhesive
Before laying down the first sheet, ensure your surface is clean and free of dust and debris by wiping it with rubbing alcohol on a cloth or shop towel.
To ensure you get the suitable adhesive, read the labels on each package or bag to determine which one has self-leveling properties. If your tiles are thick, use a self-leveling additive to prevent cracking when they’re setting.
Step 12: Laying Down Cement Board
Layout a sheet of cement board, but don’t glue it down because the adhesive will make it move around. Instead, use your tile area to help determine where each piece should go and remove excess amounts from the whole sheet by cutting them off with a utility knife.
If you have smaller pieces, put them in areas where there is less work, like the bottom of the wall.
Step 13: Laying & Sealing Tile
Lay each sheet of cement board in place using chalk lines snapped on each wall and floor for alignment. Use spacers when laying down the first few pieces to ensure they are perfectly straight before pressing them into place. If it’s not right, keep checking for chalk lines and move the chalk line accordingly by pushing it back into place on the floor or wall with your fingers.
Step 14: Applying Adhesive to Back of Tile
Once your sheets are laid, use a grout float to spread adhesive on the back of each tile and start laying them down. Work in small sections so you can move around easily. Use spacers between each sheet while you put them up to keep them perfectly straight and lined up with one another.
Step 15: Cutting Tile Pieces
Use a tile cutter or a wet saw to cut each piece. Try starting with a larger piece and cutting it down because it’s harder to cut smaller pieces after you’ve been doing this for a while.
Of course, you can always come back later to do the final touchups, which will be easier if you don’t have to do as much work at once.
Conclusion:
A tiled shower ceiling can be a beautiful addition to any bathroom. However, tiling your ceiling is not as hard as it may seem, and with these tips, you’ll have no problem installing tiles in the most professional way possible!
If you’re interested in adding this finishing touch to your home, read on for some expert advice on how to tile shower the ceiling like an expert.
There are many benefits of using professionally installed tiles over other options, even if they seem cheaper or easier at first glance. You will save yourself time and money by following our simple guide. Who doesn’t want that?
For more information on how to tile your shower ceiling, contact us today!
Angela Ervin
Angela is the executive editor of DIY quickly. She began her career as an interior designer before applying her strategic and creative passion to lifestyle and home. She has close to 15 years of experience in creative writing and online content strategy for housekeeping, home decorations as well as other niche efforts. She loves her job and has the privilege of working with an extraordinary team. She lives with her husband, two sons, and daughter in Petersburg. When she's not busy working she spent time with her family.


