
How to Transfer Drawing to Skin Without Deodorant
Introduction:
Skin drawing is a form of temporary tattooing that employs a pin-prick method for transferring drawings to skin. The result may or may not be colored but instead creates a pecky line impression upon the skin that resembles scarification. Some people place the results under clear resin and seal it, thus creating a permanent tattoo. In this article, I will discuss how to transfer drawing to skin without deodorant. So let us get started.
Stepwise Guide on How to Transfer Drawing to Skin Without Deodorant:
Step 1
Sketch out your tattoo idea with a pencil so we can get an idea of the design. Just like any other graphic, we need a basic outline to work from. Draw lightly so we can easily erase it later if needed.
Step 2
Cover the area with a piece of cloth, making sure the edges are secure. Be careful not to smudge the lines! Keep the cloth tight to the skin to prevent leakage and falling off.
Step 3
Now, take a deodorant spray and spritz this side with water mist two-three times. This will create moisture and make this side damp.
Step 4
Take a strip of paper towel and place it over the dampened area. Now take another piece of cloth and cover this paper towel as we did previously (tight on one side).
Step 5
Carefully lift this paper towel along with the cloth combination. The tattoo outline should be clearly visible on the new sheet. If not, then repeat steps 3 & 4 for better results.
Step 6
shave off unwanted hair from the skin using an electric shaver or razor (Be careful while shaving sensitive parts such as lips, nose, etc.)
Step 7
Apply petroleum jelly all over shaved areas to avoid irritation; let it stay for 10 minutes.
Step 8
Now, take transfer paper and place it over the tattoo outline with the sticky side down. Next, take a ball pen or marker and trace the outline of your tattoo carefully by pressing the sheet from the backside against the skin.
Step 9
Take a piece of cloth and cover the paper towel as we did in step 4 to prevent leakage.
Step 10
You will need an electric heating pad and a new sheet. Turn the heating pad on to the high setting for 40 seconds. Apply the hot pad to the covered area. You should see the tattoo outline transfer to the new sheet. If you don’t see results, apply heat for two more seconds.
Step 11
Now, put a cold compress all over the area to fix ink in place. It will take an hour or two to dry completely.
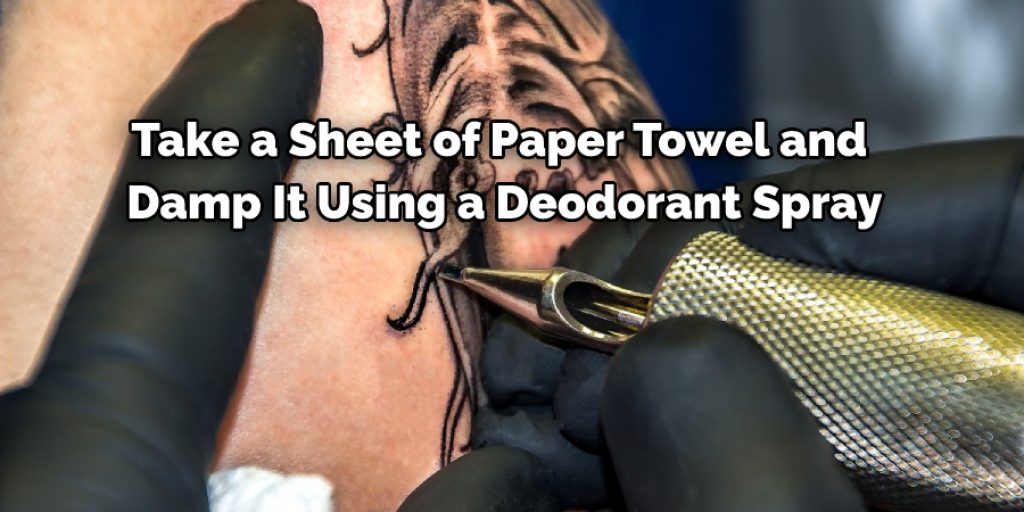
Step 12
Take a sheet of paper towel and damp it using a deodorant spray; make sure no water gets inside the tattoo area. Now carefully remove transfer paper (sticky side up).
Step 13
Now, take rubbing alcohol and apply it all over the tattooed area to fix ink in place. Let it stay for about 15 minutes.
Step 14
Last but not least, a clean tattooed area with mild soap & tepid water. Apply a moisturizer afterward. Don’t use any lotion or moisturizer immediately after the procedure, as that might dilute your design!
Precautions While Transferring Drawing to Skin Without Deodorant:
The transfer will stick better if the skin is not dry . If it’s cold, warm up the drawing for a moment by holding it in your hands.
Make sure that you pick up all the drawing details with your sponge or brush and don’t leave any blank spots. A hand mirror can help with those hard-to-reach places (make sure the light is good and strong). If you make a mistake on one area of the tattoo, allow it to dry and repaint over it again. Don’t try to correct an entire section at once, as this may tear up your stencil and do more work for yourself; successful tattoos take time!
Give extra attention to detail such as fine lines, eyelashes, eyebrows, hair, and the dark areas of the tattoo, such as around the eyes or mouth.
When you’re finished, clean up any mistakes. If you made a mistake that’s too big to erase, allow it to dry, then prepare another stencil and start over! Make sure to let your drawing dry before moving on (old-fashioned masking tape works best).
Wait 2-3 hours for drying before applying baby powder or deodorant (depending on what color you use) and wipe it off carefully with a towel. Afterward, lightly rub candle wax into the design—this will help keep perspiration from interfering with your linework!
How to Make a Temporary Tattoo With Paper?
Step 1:
Print out the desired image on paper, cut it into any shape and size.
Step 2:
Step 3:
Now, take a ballpoint pen; mark on top of that sticky foam sheet using this pen till you create shallow cuts on the skin. Make cuts according to the pattern of tattoos to be transferred.
Step 4:
Now, bring an ink pad and place it on top of stenciled cuts. After this step, remove the sheet from your body by removing the tape gently. One can also use an oil-based marker for mark cutting, but it is better to take care of because they are leaving behind stains that are not easy to clean.
Step 5:
Stick or attach the stencil sheet over the marked area again so that the tattoo design is facing down towards the adhesive side of the paper. The important thing here is that you will stick the stencil sheet right side up concerning the adhesive side of paper under it this time. You can put some heavy books or any other weighty thing on top of the stencil sheet so that the design is in contact with the adhesive side of the paper. This will ensure that ink is transferred properly to the stencil sheet and that the tattoo design is successfully depicted on paper.
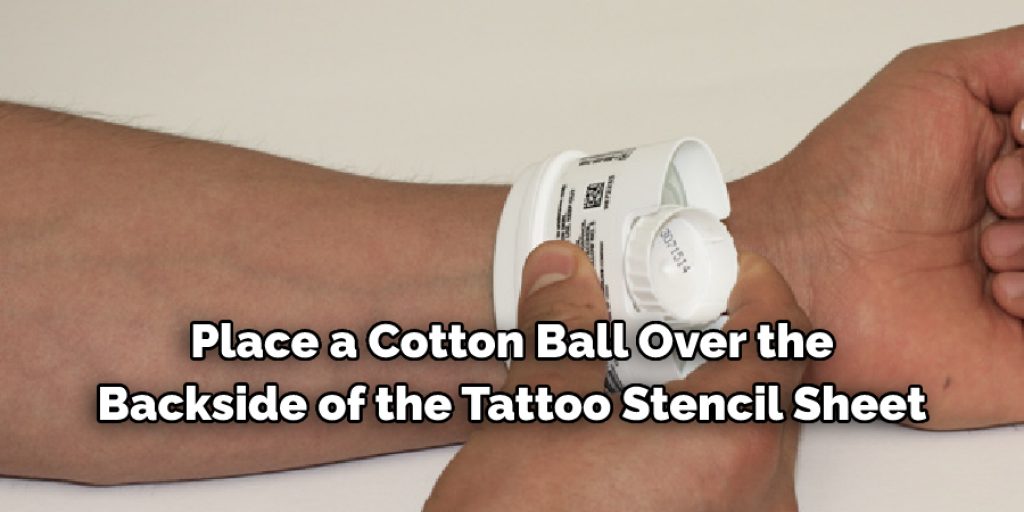
Step 6:
Now, place a cotton ball over the backside (paper side) of the tattoo stencil sheet and press it using something like a roller or even you can use your hands for this purpose. You need to apply enough pressure to get the best result for this purpose because the transfer has to happen very well, but make sure that the material (foam sheet) under the stencil does not get distorted and removed from the skin.
Step 7:
Gently remove the stenciled paper from your body; you will find attached tattoos in the shape of cutouts made earlier over cut-outs made on the skin using a pen.
Step 8:
You can put a few drops of baby oil over the temporary tattoo so that it becomes easier to remove from the skin, but make sure that baby oil doesn’t get in contact with your eyes because it will burn your eyes badly if any amount goes inside. Also, wash the area where you have made tattoos once you remove them from the body to prevent infection or dirt from accumulating inside these cuts.
How to Remove a Tattoo?
1. First, you must wash the tattoo with soap and water for about 5 minutes.
2. After that, gently scrape the skin over the ink using a flat edge razor blade to remove excess ink from your skin.
3. Then pat it dry with a paper towel or soft cloth and apply ice packs on it for 10-20 minutes over the area where a tattoo needle has pierced.
4. You can use an antiseptic cream to wipe clean your tattoo before piercing it again, but make sure you do not get any infection while performing this step as infections result in puss formation around the punctures causing pus-filled bumps accompanied by swelling and itching sensation at the site of tattooing. If you develop puss-filled bumps then you may have to consult a physician at the borders of your state or country.
5. Dap on some petroleum jelly over the punctured skin to avoid tattoos from scarring and scabbing due to scratching habit.
6. Keep piercing your tattoo no more than once every 7-10 days to give it enough time for healing. Otherwise, tattoos can get infected by viruses such as hepatitis C, Hepatitis B, and HIV if piercing too frequently. Tattooing is also linked with risks of developing skin cancer.
7. The best way to enjoy your new look is by taking proper care of your tattoo after removing it – i.e., moisturizing and exfoliating your skin once or twice a day.
8. You can also use sunscreen for the protection of your tattoo from UV rays.
9. Avoid deodorants, perfumes, and other cosmetics on the tattooed area until it completely heals. This will prevent irritation and infection in your body, and you will get a fresh-looking tattoo within no time.
10: You can even remove tattoos by laser surgery or medication, but these ways are costly and not easy to perform at home. So we suggest you take all precautions before performing such procedures so that you may not have to face any serious troubles in the future.
Frequently Asked Questions:
What Can You Use to Transfer Stencil to Skin?
Most tattoo artists prefer to use white chalk because it allows them to see the transfer better. However, if you do not have white chalk, you can substitute other items that should also work well. For example, some people have found success using cream eyeliner or lip pencils as an alternative.
While they are not designed for this purpose, they are still able to function successfully. Other options include crayons and markers intended for skin coloration. If you happen upon these items while shopping for supplies or gifts, feel free to try them out in your next stencil transfer!
Place any stencil material (foam sheet) over the area of your body where you want to get tattooed. It is better to go with a traditional method of applying temporary tattoos; use adhesive tape to attach these stencils firmly to desired parts of your body like back, shoulder blade, etc. If you are attaching tattoos on the arms or forearms, make sure to cover the entire part and hold them down with some masking tape.
Conclusion:
I hope this article has been beneficial for learning how to transfer drawing to skin without deodorant. Ensure all the precautions while performing the process. Thank you and have a nice day!
Check out our article How to Draw Mehndi Designs Step by Step on Paper
Elizabeth Davis
Elizabeth is a creative writer and digital editor based in the United States. She has a passion for the arts and crafts, which she developed from a young age. Elizabeth has always loved experimenting with new mediums and sharing her work with others. When she started blogging, she knew that DIYquickly would be the perfect platform to share her tutorials and tips. She's been writing for the blog from the beginning, and her readers love her helpful advice and easy-to-follow instructions. When she's not writing or editing, Elizabeth enjoys spending time with her family and friends.


