How to Lube Keyboard Switches
Keyboard switches are one of the most important components in your gaming setup – they’re what makes it possible to register keypresses with lightning speed and accuracy. However, if you want those switches to stay fast and responsive for years, you need to learn how to lube them correctly.
Lubrication is an essential component of any good keyboard switch maintenance routine – as doing it properly can help protect your hardware from dirt or dust buildup, extend its lifespan, and give you a smoother typing experience overall.
In this blog post on how to lube keyboard switches, we’ll take a closer look at the process of lubing keyboard switch stems step-by-step so that you can maximize the performance benefits. So whether you want to up your game performance or just have some fun while customizing your rig, read on to find out more!
Why is It Important to Lube Keyboard Switches?
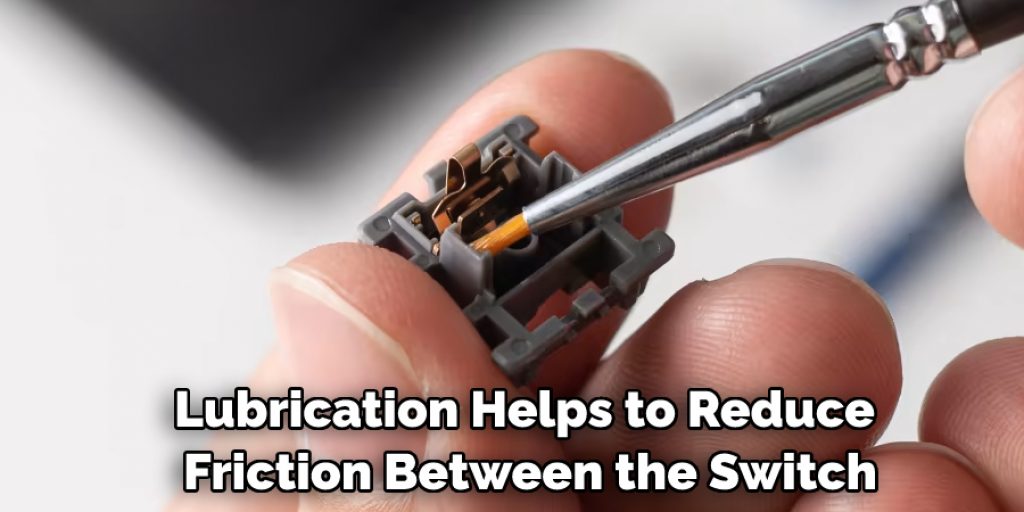
1. Reduces Friction
Lubing keyboard switches is beneficial for a few key reasons. Firstly, lubrication helps to reduce friction between the switch stems and the plate or PCB they’re being installed on. This can help ensure that key presses are registered quickly and accurately by making sure that the individual switch components don’t rub against each other too aggressively.
2. Prevents Dust and Debris Buildup
By reducing friction, lubing keyboard switches also helps to prevent dust and debris buildup around the switch stems. This is important for keeping your keyboard clean over time, as any accumulation of dirt or dust can cause issues with keypresses (or even worse – damage to the internal components).
3. Gives a Better Typing Experience
Finally, properly lubed keyboard switches can make typing or gaming feel smoother and more responsive overall. Because there’s less friction between the different switch components, your keypresses will be more consistent, and you’ll get better tactile feedback from each press. This makes for a more enjoyable typing experience and can even help to improve your gaming performance.
What You Will Need
1. Lube
The first thing you’ll need to lube your keyboard switch stems is the lubricant itself. There are a few different types of lube that can be used for this purpose, including silicone-based grease, Krytox 105 oil, and special switch lube like Tribosys 3204. It’s important to get the right type of lube for your specific keyboard model, so make sure to do some research and find out which one will best suit your needs.
2. Tweezers or Needle-Nose Pliers
You’ll also need a tool like tweezers or needle-nose pliers to pick up and manipulate the individual switch stems. This will help ensure that you’re able to accurately apply the lube and get into all of the tight spaces around your keyboard switches with ease.
3. Q-Tips or Cotton Swabs
You’ll also need a Q-tip or cotton swab to wipe up any excess lube that might get onto the switch stems. This will ensure that there’s no residue left behind and that your keyboard switches are lubricated in a neat and tidy way.
10 Ways How to Lube Keyboard Switches
Now that you have all the necessary tools and materials, we can get into the actual process of lubing your keyboard switches. Here are 10 steps to follow when it comes to correctly lubricating your switch stems:
1. Unplug the Keyboard
The first step is always to unplug your keyboard from any power source or computer it may be connected to. This is a safety measure that will help protect you and your keyboard from any potential damage during the lubrication process.
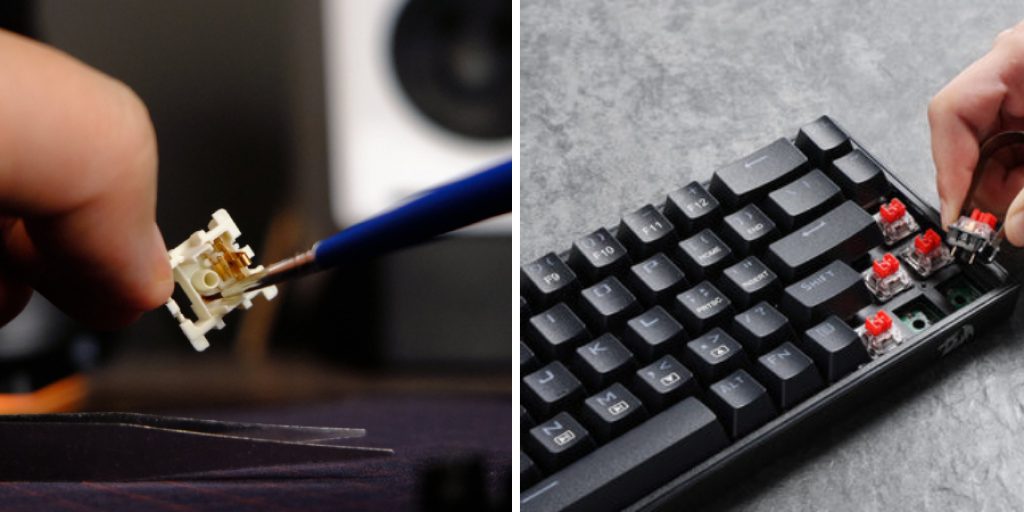
2. Remove Switches From the Plate or PCB
Next, take out the individual switch stems from the plate or PCB they’re installed on using tweezers or needle-nose pliers. This will help make sure that you can access all of the components for lubrication.
3. Clean Switches with Isopropyl Alcohol
Once the switches are out, use a cotton swab to clean each one using some isopropyl alcohol. This will help remove any built-up dirt or debris and ensure that the lube is able to evenly and accurately applied.
4. Apply Lube to Stems
Once the switches are clean, it’s time to apply some lube. Use your tweezers or pliers to carefully pick up each switch stem and apply lube as necessary. Make sure not to over-lubricate, as this can cause issues with keypresses and reduce the lifespan of your keyboard.
5. Use Q-Tips to Wipe Up Excess Lube
Once you’ve applied lube to all of the switches stems, use a Q-tip or cotton swab to wipe up any excess lube that might have gotten onto other parts of the switches. This will help ensure that your keyboard is lubricated in a neat and tidy way.
6. Reinstall Switches to Plate or PCB
Once all of the lube has been applied, reinstall the switches back into the plate or PCB they were originally installed on. Make sure to check each one for any signs of excess lube before screwing the switches back into place.
7. Check Keypresses
Once your switches are installed, it’s time to test them out. Try pressing each key a few times to make sure that the lubrication has been applied evenly and that there aren’t any issues with stickiness or inconsistency in keypresses.
8. Reattach Keycaps

After testing out the keypresses, you’re ready to put the keycaps back on. Make sure that each one is in its correct place, and then use a keycap puller to help get them into position without any difficulty.
9. Clean Up the Work Area
Once all of your keycaps are in place, take the time to clean up your work area and make sure that all of your tools and materials have been put away. This will help keep everything organized and ensure a neat and tidy workspace.
10. Enjoy
And finally, when all is said and done, enjoy your newly lubricated keyboard switches! Your keys should be feeling much smoother and more responsive, allowing your typing experience to be more pleasant and efficient.
Now that you know how to lube keyboard switches, it’s time to get out there and start putting this new-found knowledge into practice! Taking the extra time and effort to properly lubricate your keyboard switches can help them last longer and give you a better typing experience. So don’t wait any longer. Grab some lube and get to work! Your keyboard will thank you for it.
8 Safety Precautions to Follow
When lubing keyboard switches, it is important to keep safety top of mind. Here are 8 safety precautions to follow:

1. Wear protective gloves and eyewear when lubing keyboard switches. This will help protect your skin and eyes from hazardous substances that may be found in the lubricants used in keyboards. Wearing a face mask is also recommended.
2. Make sure to work in a well-ventilated area away from open flames and other sources of heat. This will help prevent any vapors or fumes created by the lubing process from accumulating and causing harm.
3. Wear clothing that covers your entire body, including shoes that cover your feet. This will help protect you from coming in contact with any substances that may spill during the lubing process.
4. Make sure all power sources are unplugged and disconnected before beginning the lubing process. Unplugging and disconnecting power sources ensures that no electricity is running through your keyboard as you work, which can be dangerous.
5. Gather all of the necessary tools and materials before beginning the lubing process. This will help ensure that you have everything needed to complete the job correctly and efficiently without having to search for something mid-process.
6. Read through your keyboard’s manual or user guide thoroughly before attempting any lubing process to ensure that you are following all of the manufacturer’s instructions and guidelines.
7. Exercise caution when handling lubricants or other potentially hazardous substances used in the lubing process. Keep any containers tightly closed when not in use, and never directly inhale them.
8. Dispose of lubrication waste properly after completing the lubing process. This will help prevent any hazardous substances from entering the environment and causing harm.

Following these 8 safety precautions will help ensure that you can safely and successfully complete a lubing project on your keyboard switches. Always remember to work with caution and take all necessary measures for protecting yourself from harm when lubing keyboard switches.
Conclusion
After reading through this post on how to lube keyboard switches, you should now have a better idea of how to properly lubricate your keyboard’s switches. Not only is it an essential step in maintaining and prolonging the life of your keyboard, but it can also help to increase its performance so that you can get maximum speed and accuracy out of every keystroke.
Remember that lube should be applied carefully, as too much or too little can negatively affect the switch internals. For best results, use a specialized lube like Krytox 205g0, which has been designed specifically for keyboards. If done correctly and regularly, lubrication can help you enjoy a smooth and quiet typing experience for many years to come!