How to Tune Aero Ports
There’s nothing like your car engine revving sound to let you know that it’s properly tuned. But have you ever given thought to the noise your bike makes? Like your car, a well-tuned bike is essential for peak performance and can make all the difference when tackling those tricky rides. In this article, we’ll show you how to tune Aero ports for optimal results. So read on and get ready to take your cycling game up a notch!
We all know that aero ports improve the airflow to your engine, but did you know that they can also make your bike sound better? That’s right, by tuning your aero ports, you can improve the performance of your bike and make it sound great. The best way to tune aero ports is by using a dyno. This will allow you to see the before and after results of your work so you can make adjustments as needed. If you don’t have access to a dyno, don’t worry. There are other ways to tune your aero ports.
What Are Aero Ports?
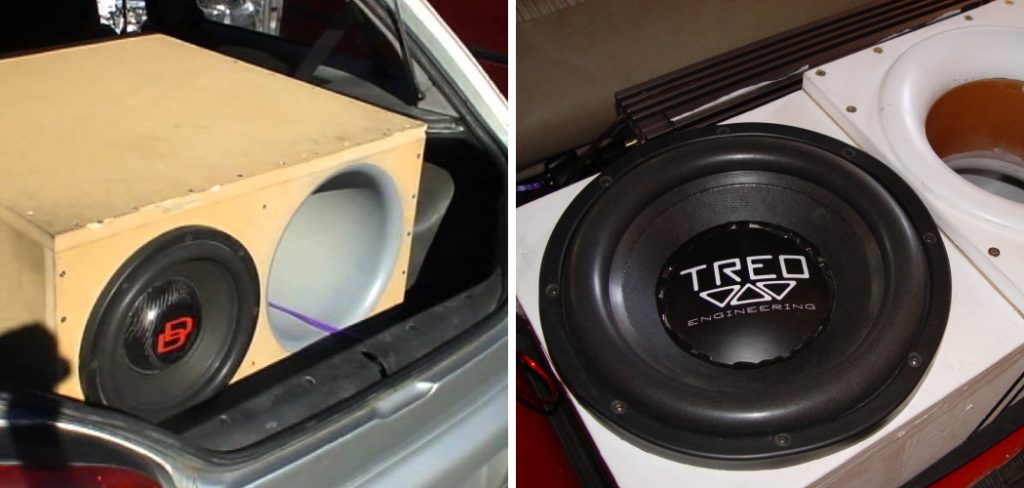
An aero port is a type of acoustic treatment used to improve a room’s sound quality. Aero ports are typically used in recording studios and other venues where sound quality is paramount. Their primary function is to absorb low-frequency sound waves, which can help to reduce reverberation and improve clarity. In addition, aero ports can also be used to increase the bass response of a speaker system.
Aero ports are typically made from materials such as fiberglass or foam, and they are available in a variety of sizes and shapes. The size and shape of an aero port will depend on the application used for it. For example, a small aero port may be sufficient for treating a single speaker, whereas a larger port may be necessary for treating a subwoofer. In most cases, aero ports are placed behind the speakers or near the room’s corners to maximize their effectiveness.

How Can You Tell if Your Aero Ports Need Tuning?
If you’re not sure whether or not your aero ports need tuning, there are a few things you can look for:
- Uneven airflow from the port. If one side of the port is blowing harder than the other, it’s probably because the baffles inside the port aren’t aligned properly.
- Resonance. If your aero ports start to resonate, they’re not appropriately tuned. This usually happens at high speeds, and you’ll be able to hear it.
- Vibration. Another symptom of ill-tuned aero ports is vibration. This is usually caused by air turbulence inside the port, and you’ll be able to feel it if you put your hand on the port while the car is moving.
If you notice any of these symptoms, it’s time to tune your aero ports!
Tools You’ll Need
To tune your aero ports yourself, you will need the following tools:
- A drill
- A step bit or hole saw that is the same diameter as the innermost part of your aero port
- A utility knife
- Masking tape
- Pencil
- Ruler or measuring tape
- Sandpaper
A Step by Step Guide on How to Tune Aero Ports
Step 1: Determine The Volume of Your Enclosure
The first step is to determine the volume of your enclosure. This can be done by measuring the dimensions of your enclosure and then calculating the volume using the formula V=lwh. Once you have determined the volume of your enclosure, you will need to decide how many aero ports you will need to use. You will need one aero port for every 16-18 cubic feet of volume as a general rule of thumb. So, if your enclosure has a volume of 64 cubic feet, you would need four aero ports.
Step 2: Decide on The Placement of Your Aero Ports
Once you know how many aero ports you will need, you will need to decide where to place them. The best way to do this is to use the graph paper method. This involves drawing a sketch of your enclosure on graph paper and mapping out where you want your aero ports to go. It is essential to keep in mind that aero ports should never be placed directly against a wall or corner, limiting their effectiveness.
Step 3: Cut The Holes for Your Aero Ports
Now that you have determined the placement of your aero ports, it is time to cut the holes for them. Again, you will need to use a drill, either a step bit or a hole saw. If you are using a step bit, start by drilling a hole that is the same diameter as the innermost part of your aero port. Once you have drilled this hole, gradually increase the size of the hole until it is the same diameter as the outermost part of your aero port. If you are using a hole saw, drill a hole that is the same diameter as the outermost part of your aero port.
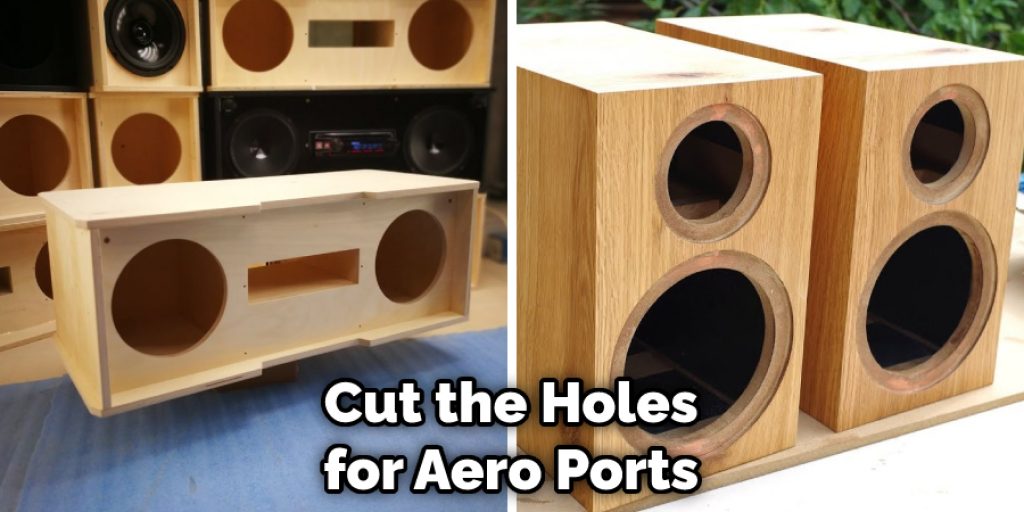
Step 4: Smooth The Edges of Your Holes
Once you have cut the holes for your aero ports, you will need to smooth out any rough edges. First, use a utility knife to remove any burrs around the holes. Then, use sandpaper to smooth out any remaining rough edges.
Step 5: Install Your Aero Ports
Now it’s time to install your aero ports. First, insert the ports into the holes you have cut, and then use masking tape to secure them. Once your aero ports are installed, you can remove the masking tape and enjoy the improved sound quality of your car stereo!
Step 6: Tune Your Aero Ports
Turning your aero ports can be done by adjusting the length of the port until you achieve the desired sound quality. To do this, start by measuring the distance from the top of your aero port to the bottom of your enclosure. Then, use a pencil to mark this measurement on the port itself. Next, use a ruler or measuring tape to measure and mark half of this distance on the port. This is where you will need to make your cut. Once you have made your cut, try out your car stereo and adjust the length of the port as necessary until you are happy with the sound quality.
Step 7: Seal Your Enclosure
The final step is to seal your enclosure. This can be done by using either caulk or duct tape. If you are using caulk, apply it around the edges of each aero port and then use your finger to smooth it out. If you are using duct tape, apply it around the perimeter of your enclosure. Once you have sealed your enclosure, your aero ports should be ready.
This is an essential guide on how to tune aero ports. For more information, please consult an expert.
How Often Should You Tune Your Aero Ports?
More commonly known as port holes, Aero ports are one of the most important aspects of keeping your car in good condition. It is, however, often overlooked by many car owners.

How often you should tune your aero ports depends on several factors, such as how frequently you use your car and the condition of the roads that you drive on. Generally, it is recommended that you have your aero ports tuned at least once every two years by a qualified mechanic.
If you live in an area with bad roads or use your car frequently for long distances, then it is advised that you have your aero ports tuned more regularly. This will ensure that they are not damaged and can continue to protect your car from the elements.
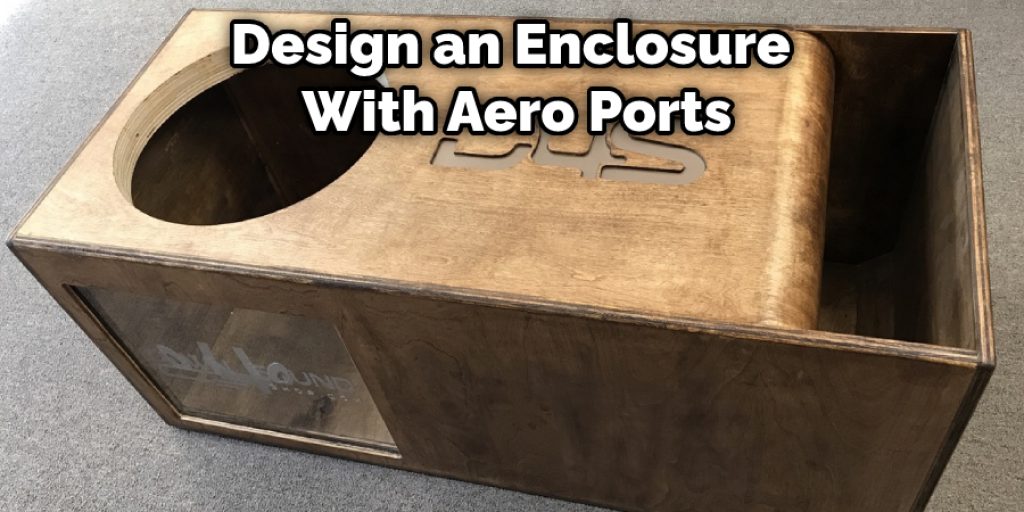
How Does an Enclosure With Aero Ports Get Designed?
There are mathematical equations that govern an enclosure design with aero ports. These equations consider the size and shape of the box, the type of driver being used, and the desired tuning frequency. Once these factors are known, the port can be placed in the optimal position within the enclosure to achieve the desired results.
Aero ports are available in different diameters and lengths. The diameter of the port is governed by the size of the driver, while the desired tuning frequency determines the length. A longer port will generally result in a lower tuning frequency, while a shorter port will result in a higher tuning frequency.
It’s important to note that aero ports should never be placed directly against a wall or surface. This can cause reflections that will muddy the sound. Instead, the ports should be flush with the enclosure or slightly recessed.
When designing an enclosure with aero ports, it’s essential to work with experienced professionals who can ensure that the final product meets your specific needs and expectations. With their help, you can create an enclosure that sounds great and performs at the highest level.
Conclusion
So, there you have it, how to tune aero ports. It is important to properly tune your aero ports to achieve the desired tone and sound quality. We have looked at three different ways to adjust your ports, so experiment with each of these steps until you find the one that gives you the best results. Happy tuning!